“Do you still draw?”

“Do you still draw?”

It has been nearly two years since my family packed our 675-sq ft. downtown apartment to move across the country for a new job. Since then, I have been asked that question numerous times by family, friends and colleagues, and I never know quite what to say. My reaction is usually tinged with a bit of embarrassment and surprise that they remember how drawing was once a part of my life. I usually say yes, but not as much. I usually say yes, so they would not be disappointed.

The truth is that I still draw for patients and in operative reports. I scribble, “left” and “right” next to organs that slightly resemble their real-life counterparts. Patients sometimes want to keep the drawings, folding them gingerly and placing them into treasured notebooks they carry with them. Or they will snap pictures with their phones and hand them back. One terminally ill patient wanted to profile it in a book they were going to write someday. I draw little cartoon bears or Pikachu’s for patients (as requested) to mark the site of their surgery, instead of writing my initials, as per operating room protocol. I sometimes get laughs from patients, asking how many times I draw the same thing. I pull out pages of identical drawings from my clipboard that day. While I may not sit and draw for hours like I used to, drawing connects patients with their (or their child’s) condition and what the future may bring. It is something that opens up a dialogue for us to share, rather than being a one-sided lecture from me, their specialist. Still, that is probably not what people are referring to when they ask whether I still draw.

Like so many of my unfinished projects, I will probably get back to drawing again some day when I am ready. I have a revolving list of things that need to get done each day, i.e. what I need to do for my patients, writing reports of what I did, billings, forms, taking the baby to and from daycare, making sure the kids are fed, happy and get enough sleep, and everything in between. Drawing, like hitting the gym or eating more veggies, is in the pile of things that I know that I should do. It is a privilege and pleasure, so naturally, it gets assigned a lower priority.

Last week, I flew to an international medical conference held in San Francisco. I ducked out of the afternoon session on the last day and strolled the streets of the city. Looking up from the sidewalk, I saw a piece of anatomic art turned street art. Delicately drawn flowers with a brain topping each stem. It was a reminder of the beauty of drawing and the joy that drawing once brought to my practice as a surgeon. As I wandered San Francisco, I felt connected to being an artist again, rather than merely a technician.

-LCTL

AMI 2016 in Atlanta, GA!

The Association of Medical Illustrators Annual Meeting (AMI) 2016 is now in full swing!

It is a sunny day in Hotlanta with a high of 95. Hence, the flames on the conference bag (left). The conference hotel is appropriately shaped like a thoracic cage (right).

-LCTL

Teaching Drawing Skills to Other Surgeons

Drawing has been a very positive influence on my development as a surgeon. Naturally, I wanted to share that with others in our Division. The premise being that visual notes are useful for learning, communication and medical documentation.

The plan was to have two medical illustrators and a staff/mentor lead a workshop on visual note-taking for our colleagues. When those three could not do it at the last minute, I was Plan D! I cobbled something together and here’s what it looked like:

Warm up exercise 

  • First, draw from memory and then, from a reference object

Discussed the question “Why Draw?”

Discussed the notion that “I can’t draw!”

  • Emphasized that this session is not about drawing in the artistic sense but rather, visual note-taking.
  • Shared drawings/visual notes from some of my residents and my own sketchbook, which gave them an idea that it doesn’t always have to be representative or artistic. It just has to be a visual reminder for the draw-er.
  • Gave pointers on what to draw. I made up an acronym “STAIRS” just to be cute.
    • Sutures
    • Traction (e.g. traction sutures, retractors)
    • Anatomy
    • Instruments and hands
    • Relationships (i.e. between anatomical landmarks)
    • Symbols

paris-louvre-marble-stairs

  • You might ask what does “Symbols” mean? It is just a way of representing common objects, like one would use simple icons. Scissors could be drawn as:  scissors-128

Answered the question, “Why not just take photos or watch videos on YouTube?”

  • This is a very good question from a senior colleague. I think the difference here is that there is a very active component to drawing. As you trace out the anatomy, you experience the image very differently than merely looking at it.

Finally, we ended with drawing exercise.

  • I chose a YouTube video of a kidney transplantation. Not only is the anatomy clear and well-defined, it can also be the most satisfying operation to perform (I recall all the times that patients literally cried out of happiness when their new kidney made urine).
  • We divided the surgery into 12 parts and each of us were assigned a step to draw
  • Watched the video and drew our assigned step
  • Presented our own drawing (in sequential order)
  • I was so proud of everyone at the end, when we had a full panel from start to finish of this operation! It proved that they all can draw!

Overall, it was an enjoyable experience to share this with my colleagues. I don’t know if it will change the hardcore skeptics but I think it made a few consider drawing in the future. A week later, I saw one of my co-workers make a small sketch in his clinic notes for the first time and it made me smile.

-LCTL

Build your own surgical sketchbook

Sketchbooks come in every imaginable size, binding and paper to suit any purpose. Coupled with my stationery obsession, I have more sketchbooks than I will ever need or use. One limitation to the sketchbooks, in all their variety, is the lack of customization. You are essentially stuck with whatever order your drawings are in and whatever paper is in that sketchbook.

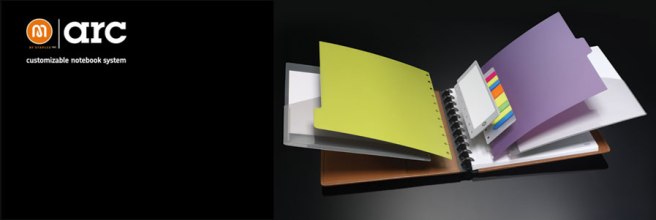
I came across the Arc Customizable Notebook system from Staples a few months ago. It has been amazing for my Bullet Journal. It contains 8 rings, a durable poly or leather cover and pages that can be moved around. Like a binder in its flexibility but feels like a notebook. I’ve recently thought of applying it to a surgical sketchbook for use as I transition into practice.

header

Here’s what one will need:

  • Small Arc Notebook (6-3/8″ x 8-3/4″)
    • Poly cover – $7.99 USD
    • Leather cover – $16.99
  • Tab dividers – $4.99
  • Arc System Desktop Punch – $42.99 (whoa!)
  • Lined paper for written notes
    • Comes with notebook
  • Sketchbook paper of choice
    • For me, it’ll be mostly white paper and a few pages of toned paper
    • 8.5″ x 11″ 45-lb white paper for dry media (cut in half)

My sketchbook will contain sketches for common surgeries, divided into 5 main sections. I have been dragging my feet on this due to the desktop punch. Not only is it pricey, it is also heavy as sin. And I’ll be transporting it across the country for the big move after fellowship.

This book will serve as my own personal surgical atlas and flexible enough to make changes as my techniques evolve.

I’ll post again once I actually do this!

-LCTL

Guide to photography in the operating room – Part II (Editing)

The editing phase is almost as important as taking the photos themselves. A camera is only a tool and as such, cannot replicate the images that we see with our own eyes. If the photos turn out too dark, too bright, too blue or too red – as they tend to – this can often be corrected. In Part I, I made a few recommendations to make the editing phase easier. That includes shooting in RAW format and using a white balance card.

Software – Adobe Creative Cloud offers a photography package with Photoshop and Lightroom for a discounted price ($9.99 USD/month). Photoshop is handy for touching up my drawings but I use Lightroom exclusively for photographs. If you are looking for free software, here’s a useful link.

Tutorial –  Colin Smith has a fantastic 15-minute Lightroom tutorial that will teach you everything you need to get started.

My workflow (in 5 easy steps):

  1. From my SD card, I import the photos into Lightroom for editing.
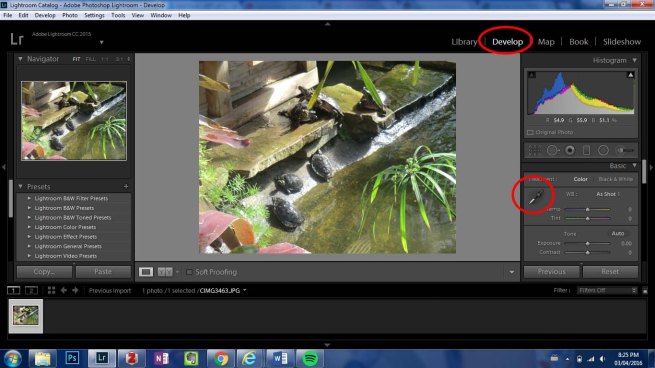
  2. In Develop mode, I select one image to white balance (either the one with the white balance card or one with a clean white gauze in the image). Click on the dropper and apply it on to the white area. I took this image with our point-and-shoot camera at the local botanical garden:Lightroom Screenshot WB
  3. Select all images > Sync > Synchronize.
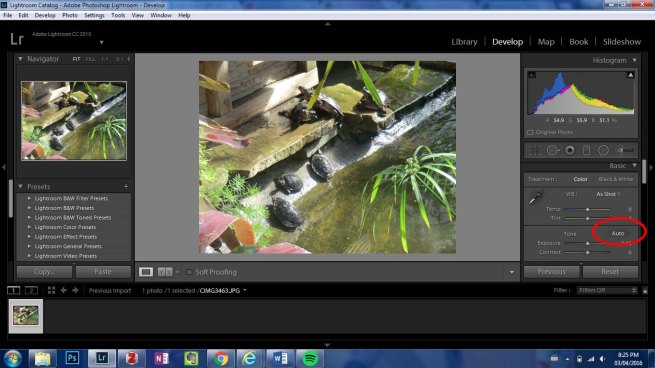
  4. There is probably a faster way to do this but with each image, I click on the Auto button in the Tone menu to correct exposure and contrast. I used to do this by manually adjusting the exposure and eyeballing the histogram (ensuring the grey curve falls in the middle) but this takes the guesswork out of it. Lightroom Screenshot Auto
  5. In Library mode, export all edited images to a secure drive and delete the images from the SD card + Lightroom.

Hope this was helpful!

-LCTL

Guide to photography in the operating room – Part I

With the advent of digital photography and falling costs of DSLR cameras, high quality photography has become more accessible to the masses. Intraoperative photography can be useful for documentation, capturing a rare finding and for patient or trainee education. It has become so ubiquitous that it is integrated into the consent process when surgeons discuss surgery with patients. Obtaining explicit photography consent should be the norm.

Photography is more common in medical specialties where visual documentation is essential, e.g. dermatology, plastic surgery, pathology, etc. We used to page the medical photographer to the OR whenever there was a rare finding or new technique. This was back in the era of film and he would give the surgeon physical prints. For better or worse, we have moved from professionals to surgeons taking photos.

I had the pleasure of following around two dedicated medical photographers for a day. They answered questions, demonstrated their workflow (from photographing to editing), let me use the equipment and gave feedback. I left with a better understanding of photography and changes that I could employ without buying anything new. There were a few equipment recommendations that I could invest in later, if I wanted to.

The OR presents unique challenges (e.g. artificial lighting, time constraints, distance from the subject, etc.) that can be overcome with a few simple tips. Here’s the gear I use:

  1. Camera – I recently purchased an entry-level Nikon D3200 DSLR with my credit card points (retails at $450 USD, including lens kit) that I keep at work for this purpose. It has a sharp image sensor and all of the functions that you would want in a DSLR. That being said, the gap in photo quality between point-and-shoot cameras and DSLR cameras is narrowing. If you want a light, compact and relatively inexpensive camera, point-and-shoot is the way to go. If you want more control over camera settings and are looking for an investment piece, DSLR is great for that. I was told that you can invest in some nicer lenses and change out the body every few years.
  2. Lens – The lens kit that came with my camera is meant to be cheap and versatile (AF-S DX NIKKOR 18-55mm VR II Lens Kit). For close-up photos, a macro lens is far better but it would be an investment. Given that it is super light and can zoom in decently, I am going to stay with my current lens for now.
  3. Hand strap – Great for hand-held photography. I removed the neck strap because it was cumbersome, awkwardly too long and short. Also, I would not want to fall into the sterile field.
  4. SD card – I upgraded from my 1GB to a faster, larger 64GB SD card. A larger card ensures you don’t run out of memory. In most instances, you won’t have the luxury of stopping to transfer photos off the card.
  5. White balance card – Most ORs don’t have windows. Sunlight has colors from across the light spectrum and gives some of the nicest photos. The issue with artificial light is that it has a narrower spectrum. Often, my brain knows that the “color temperature” is off but I can’t quite figure out how. Take the guess work out of it by using a white balance card and taking a photo with the same light source beforehand. It will help a lot in the editing phase.
  6. Camera cleaning kit + caviwipes

Stuff that I might get some day but I happy to do without:

  • Macro lens – much better for capturing details up-close
  • Plastic diving bag – something that both protects the camera and I can wipe with caviwipes or even sterilize, to get a little closer to the sterile field. Right now, I keep my distance for these reasons.
  • Ring flash – handy for photographing in a deep and/or small incision or space
  • Polarizing lens – reduces glare off of shiny tissues.

Here’s my current workflow:

  1. Take a photo using the overhead OR lights + white balance card on the OR table. Before the patient comes in the room, obviously. Will help in post-production.
  2. Ensure photography consent has been obtained from the patient or substitute decision-maker.
  3.  If I am not scrubbed in the case, I like to move around and take photos from different angles. If I am, I’ll often ask someone else in the room.
  4. Shoot in RAW mode, rather than JPEG. When shooting in JPEG, the camera automatically compresses the file into a JPEG file – then that data is lost forever! If you have the data storage capacity, photos in RAW format are way easier to edit later.
  5. I found that for the given OR lights, the settings on Manual that usually work for me are as follows: ISO 100, shutter speed 1/250, f/8. Shooting on Manuel seems to give far more consistent photos, which is better if you edit your photos as a batch later. I decided on these settings after reviewing my photo settings on Auto and seeing which ones gave the best photos.
  6. I changed the focus from Auto to a Single Focus in the center of the image. Usually, that’s where I want it to focus. It can be annoying when the camera focuses on the hands or instruments, rather than the tissue at the center of the image.
  7. If you have an L-shaped ruler to place in the surgical field, it will automatically make you frame the photo properly and be square with the ruler.
  8. Occasionally, I ask people to stop for literally a second so I can take the shot. Us surgeons can be very impatient! It will pay off when you don’t end up with photos of only your colleagues’ hands.

In Part II, I’ll discuss my workflow for photo editing and post-production.

-LCTL

“You have to learn to look without preconceptions. To let go of what you think and learn to really see.”

Last week, I left class and shared a short walk with the Director of Bioethics at my home institution. Our lively conversation started with bioethics, then went to grant writing, then arts-based research methods and finally, to the intersection of art and medicine. She remembered hearing Laura Ferguson, the artist in residence at NYU School of Medicine, speak at a recent American Society for Bioethics and Humanities conference. It was an odd thing to hear an artist speak about her experience with scoliosis and teaching an art and anatomy at a bioethics conference:

Drawing the Human Heart

For those who want to hear about her experience teaching medical students art and anatomy, I would recommend starting at 24:00 min.

I’ll end this with some beautiful quotes from Laura Ferguson.

On seeing in art:

“The key to good drawing is openness. You have to learn to look without preconceptions. To let go of what you think and learn to really see.”

For those who are learning (and never cease to learn):

“You may not have always the tools or the techniques to get what you see onto the paper, to allow others to see through your eyes. But that is the goal. To bring others into the experience.” 

-LCTL

How to Overcome Your Fear of Drawing

To date, I’ve spoken to three groups of surgeons and trainees, as well as other individuals about the use of drawing for surgical education, documentation and generally “figuring stuff out”. The most common response is, “I can’t draw.” This is coming from surgeons who have two fully-functioning hands, trained for years to operate and have fine motor skills better than the majority of the general population. And yet, the act of drawing is what they do with the scalpel or Bovie (a.k.a. electrocautery tool) in the operating room. For me, I had an inherent fear of drawing until my early thirties. In the end, it took an influential mentor, supportive family and friends, an art class, a sketchbook and the will to try.

It was a mental hurdle, rather than a lack of ability.

Here are 10 steps for anyone to overcome their fear of drawing:

  1. Forget about perfection.
  2. Buy a notebook – Something that is nice enough that you’ll want to use it but not so expensive that you’ll be afraid to use it (ahem, Moleskin). I started off with a regular $2 lined notebook from Staples. I made both written + visual notes and found the lines were less intimidating than blank pages.
  3. Get into a routine of drawing (daily if possible) – This could mean taking 5 minutes at the beginning or end of your day. The key is making it a habit.
  4. Roughly outline the image(s) first and fill in the finer details later – Do this without erasing anything at first. You can always return to this later with a darker pencil or pen over your outline, erasing mistakes later. The key is getting it down when your memory is fresh.
  5. Draw from reference photos or other stationary objects – Learning to draw is not just about mark-making but also honing your skills of observation. Photos and stationary objects will give you more time to observe. For instance, those who are learning to draw figures might go to a museum or gallery to learn on statues first.
  6. Listen to music – This might help for some distraction and “loosen” you up.
  7. Take beginner drawing class or buy a beginner drawing book – I prefer the art class, since it gave me a chance to be among other beginners and realize that I’m not totally off. They might get you to do some exercises to loosen up and be freer with your drawing, depending on the instructor. I found this to be immensely helpful.
  8. Show your work to (supportive) family and friends – Depending on who they are, you might have to be a bit selective on this one. People are generally very encouraging and not expecting you to be Michelangelo.
  9. Deconstruct your subject – Breaking down the object into simple geometric shapes is what many experienced artists still do and makes drawing much more accessible to novices. Then for shading, breaking tones down into 5-6 discreet tones will add realism (but not a necessity at this stage).If you can simplify it, then do so.
  10. Accept that you will never be done – Along the same vein as “Forget about perfection”, there is always something that you could add or change. If you accept that you’ll stop at (arbitrarily) 50% or 75% or 80% of completion, then it will allow you to move on.

Do you have any other tips to share? If so, leave a comment or share them with me @SurgicalArt on Twitter. Oh yes, I’m on Twitter now. Something I never thought I would say.

-LCTL

Workflow for Illustrators

For illustrators, it can get cumbersome to share multiple illustrations with multiple people, and get feedback from them all. It would be great to have a cloud-based solution that allows people to make comments in real-time. Last year at the Association of Medical Illustrators (AMI) Annual Meeting, Andrew Swift of iSOFORM presented his workflow on GoogleDocs and DropBox.

I started adopting it for the projects that I’m involved in and it is awesome. It makes me want to use GoogleDocs more often for collaborative projects. I love that you can include reference photos, real-time comments and a built-in approval process:

-LCTL


Speaking at the AMI 2016!

At the Association of Medical Illustrators (AMI) Annual Meeting in 2015, I was simply blown away by the talent within the medical illustration community. Not only do medical illustrators create beautiful works of art, they also have a unique hybrid of skills – both in the worlds of art and science. It was that skill set that can be useful for problem-solving and we saw many examples of how medical illustrators helped to develop novel solutions to challenges in medicine. At this conference, I had wonderful side conversations at the coffee breaks, over beers and over dinner with other attendees. We shared an immediate bond over our (geeky) love of art and medicine. Our conversations were surprisingly genuine and in-depth, and not the idle chit-chat that I sometimes encounter at conferences.

ami_2016_logo

I thought it would be a long shot when I submitted an abstract to the AMI Annual Meeting 2016 in Atlanta, GA. The abstract was based on the idea of drawing as a tool for surgical trainees and I was going to delve into some of my own experiences. Nevertheless, I received this email the other day:

Untitled

Great…Now I have five months to worry about this!

-LCTL